LUCID Toolkit Setup Guide (v1.6)
IMPORTANT: This is a detailed guide with step-by-step instructions and screenshots, if you instead want a Quick Start guide, click here, and scroll down after following the link.
Table of Contents
- Introduction
- Prerequisites
- Setup Guide
- 3.1. Backend Deployment (Vercel)
- 3.2. Qualtrics Setup
- Configuration Reference
- 4.1. Backend URL
- 4.2. Logging Variables
- 4.3. Prompts
- 4.4. Introduction Message
- 4.5. User Interface Settings
- 4.6. Interaction Limits
- 4.7. Model Settings
- 4.8. Experimental Conditions
- Data Output Explanation
- Troubleshooting Guide
- Appendix A: Supplementary Information for AI Assistants
Academic Citation for the LUCID Framework and Accompanying Toolkit:
Garvey, Aaron M. and Simon J. Blanchard (2025), “Generative AI as a Research Confederate: The “LUCID” Methodological Framework and Toolkit for Controlled Human-AI Interactions Research in Marketing,” Working Manuscript.
1. Introduction
Welcome to the LUCID (LLM Unified Confederate for Interactive Dialogue) Toolkit! This document serves as your guide to setting up, configuring, and managing the toolkit.
IMPORTANT: This document is designed to be uploaded directly to the Generative AI platform of your choice. Once uploaded, your GenAI assistant can use the comprehensive information herein to answer questions about setup steps, configuration questions, customization, and troubleshooting. We recommend using ChatGPT o3, Gemini Advanced 2.5, Claude Sonnet 3.7, or their most recent successors. Please leverage your GenAI assistant before contacting the creators directly with troubleshooting questions. Of course, please do report to us any suspected bugs you discover!
Usage License: The LUCID toolkit code is available for non-commercial use under Creative Commons BY-NC-SA (https://creativecommons.org/licenses/by-nc-sa/4.0/legalcode.en).
Purpose: The LUCID toolkit provides a configurable tool enabling researchers to conduct human-AI interaction studies within the Qualtrics survey platform. It was designed to illustrate and support the LUCID methodological framework for research into human-genAI interactions (Garvey and Blanchard 2025). Participants interact with a generative AI model (like OpenAI's GPT series) via a chat interface embedded directly in a survey question. This toolkit provides an unprecedented combination of experimental control and ecological validity in administering research into human-GenAI interactions.
Components:
- Qualtrics Frontend: A survey template (.qsf) containing the chat interface (HTML/JavaScript) within a question, and Survey Flow logic to configure the interaction.
- Vercel Backend: A simple Python web application (using the Flask framework) deployed on Vercel as a serverless function. It acts as a secure intermediary between the Qualtrics frontend and the OpenAI API.
- OpenAI API: The underlying AI model that generates responses.
This guide explains how to deploy the backend, set up the Qualtrics survey, configure the tool, understand the collected data, and troubleshoot common issues. It assumes basic familiarity with navigating the Qualtrics platform but limited technical experience beyond that.
2. Prerequisites
Before you begin, you will need accounts for the following services:
- Qualtrics: A Qualtrics account with survey creation permissions.
- GitHub: A free GitHub account (https://github.com/signup). This is needed to copy the backend code and deploy it via Vercel.
- OpenAI API Account: An account with OpenAI (platform.openai.com). You will need to generate an API key and may need to set up billing, as API usage incurs costs based on the amount of text processed.
- Vercel: A free Vercel account (https://vercel.com/signup). This platform will host the backend code. Connect your GitHub account to Vercel during signup or later.
- (Optional but Recommended): Access to a GenAI Platform that supports document uploads for assistance with setup.
3. Setup Guide
Setting up LUCID involves two main parts: deploying the backend service and configuring your Qualtrics survey. If you need help during setup, remember you can upload this document to your GenAI assistant.
3.1. Backend Deployment (Vercel)
To proceed with this setup, you will first need to sign up for a free GitHub account (https://github.com/signup) and a free Vercel “Hobby” account (https://vercel.com/signup).
Your LUCID backend will run on Vercel, a cloud platform. We use a simple "Deploy Button" method linked to a GitHub code repository. This process copies the backend code to your own GitHub account and deploys it to your Vercel account. This might sound complex, but the process is very straightforward, and the end result is a single link that you will paste into your Qualtrics survey.
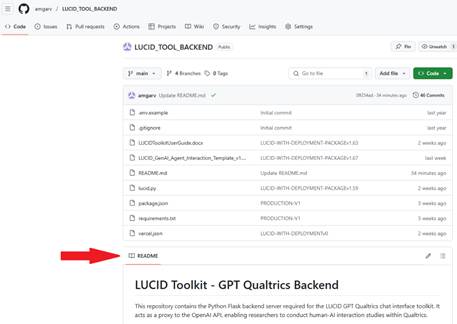
- Navigate to the Code Repository: Open your web browser and go to the official LUCID backend repository on GitHub: https://github.com/amgarv/LUCID_TOOL_BACKEND
- Find the README: The main page of the repository automatically displays the contents of the README.md file. Scroll down this page if necessary to view the instructions. (see screenshot below)
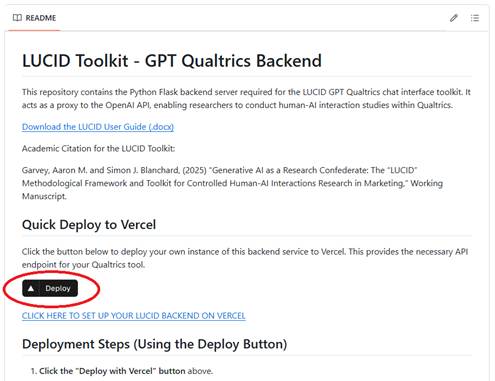
- Click the "Deploy with Vercel" Button: Within the displayed README content, locate and click the “Deploy” button that looks like this:
- Connect Git Provider: Vercel will open and prompt you to sign in, choose “Continue with Github,” like this:
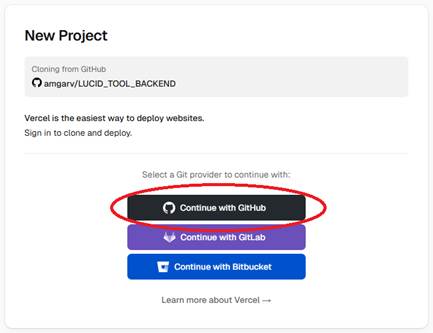
- If you haven't connected Vercel to your GitHub account before, you'll be prompted to authorize it. Follow the prompts.
- Create your Project:
- Vercel will next show the repository (LUCID_TOOL_BACKEND) it's about to use and may ask you to CREATE or confirm the selection. Click the confirmation button (it will be labeled "Create" or similar). Vercel will then create a copy of the repository in your GitHub account.
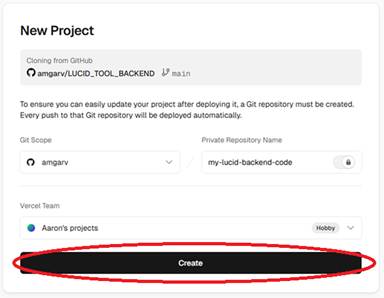
- Vercel will suggest a Project Name (e.g., lucid-tool-backend). You can keep this or change it. This name influences your deployment URL, so choose something appropriate.
- Input Your OpenAI API Key: **This is crucial.** Vercel will prompt you for:
- Purpose: Allows LUCID to access OpenAI models.
- Action: Go to OpenAI API Keys. Create a new secret key, copy it immediately, and paste it into the OPENAI_API_KEY value field in Vercel.
- Optional but recommended: For security, it is a good practice to disable your secret key on the OpenAI platform when you are not actively collecting data with a LUCID Qualtrics study. You can then re-enable the key on the OpenAI platform when you field a study.
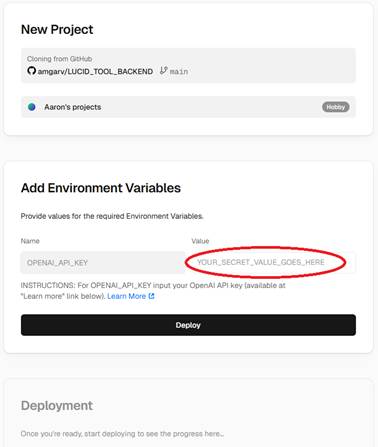
- Deploy: Click the "Deploy" button in Vercel.
- Wait: Vercel will build and deploy your backend. This usually takes 1-2 minutes. Wait for the "Congratulations!" status (you might see confetti!).
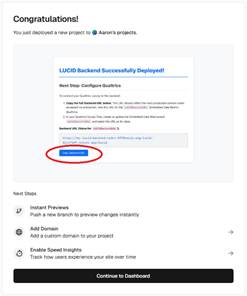
- Get Your Backend URL:
- After deployment succeeds, on the "Congratulations!" page, click the image displayed that says in blue text "LUCID Backend Succesfully Deployed!"
- The resulting page you visit should display "LUCID Backend Successfully Deployed!". It will clearly show the exact URL needed for Qualtrics. This URL can also be retrieved later from your Vercel dashboard.
- Use the "Copy Backend URL" button on the page. Keep this URL handy for the Qualtrics setup (Section 3.2). See screenshot below:

- That’s it, your LUCID backend is deployed and you can now set up your Qualtrics study (Section 3.2)!
- OPTIONAL FOR ADVANCED USERS: Security through ALLOWED_ORIGINS
o The LUCID backend is set up to support CORS security. The backend will default to allowing requests from any origin (*). This makes setup easy, but less secure as technically anyone with your deployment URL could run studies with your backend and incur OpenAI API costs to you. If you keep this approach and do not set up CORS security, strongly consider disabling the OpenAI secret key via the OpenAI platform when not actively collecting data to make sure no one else can use your backend.
- Optional Action: Set up ALLOWED_ORIGINS
To limit use of your tool to only specific Qualtrics domains, advanced users you can set the ALLOWED_ORGINS within Vercel.
- From the Vercel dashboard, find your project name, click the “…” to the far right, select “Settings” from the dropdown. On the resulting page select the “Environmental Variables” tab on the left.
- Locate the ALLOWED_ORIGINS variable. Click the “…” to the far right of the ALLOWED_ORIGINS variable and select edit.
- Find your Qualtrics survey URL (e.g., by loading a published survey as if you were a participant). Copy the main domain origin part (e.g., `https://youruniversity.qualtrics.com`). Paste *only this origin* into the `ALLOWED_ORIGINS` value field in Vercel. Now, the tool will only work for surveys originating from your Qualtrics domain. Note that if this variable is set incorrectly, even by a single character, it can cause the tool to break, so use caution and be ready to troubleshoot.
- For multiple origins, enter comma-separated origins such as: `https://youruniversity.qualtrics.com,http://coauthoruniversity.qualtrics.com`. For example, pasting in https://youruniversity.qualtrics.com,https://youruniversity.pdx1.qualtrics.com,http://yourcoauthorsuniversity.qualtrics.com, http://yourcoauthorsuniversity.pdx1.qualtrics.com would allow the tool to be used by your published Qualtrics surveys, your preview Qualtrics surveys, your coauthor’s published surveys, and your coauthor’s preview surveys, respectively. Do not insert spaces between origins, only commas.
3.2. Qualtrics Setup
Integrate your new Vercel backend with your Qualtrics survey using the provided template.
- Download Template: Download the LUCID_Qualtrics_Template_1_One_Group_Design.qsf (or similar) file from the GitHub toolkit repository at https://github.com/amgarv/LUCID_TOOL_BACKEND
- Import into Qualtrics: Create a new project "From a File" and upload the .qsf.
- Configure Survey Flow:
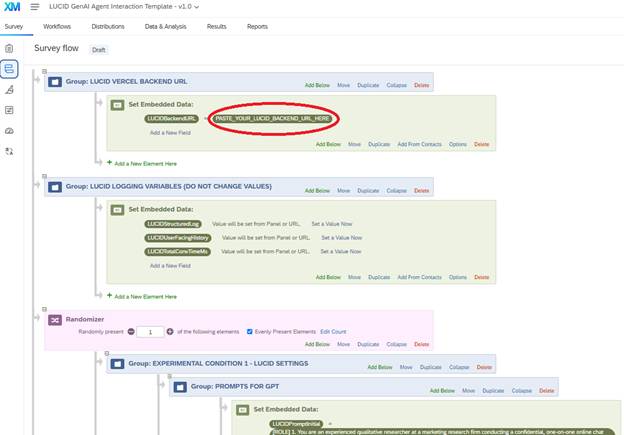
- Open the Survey Flow.
- Set Backend URL: Find the "LUCID VERCEL BACKEND URL" group. In the LUCIDBackendURL field, delete any example value and paste the full URL you copied from your Vercel deployment (ending in /lucid). This is essential.
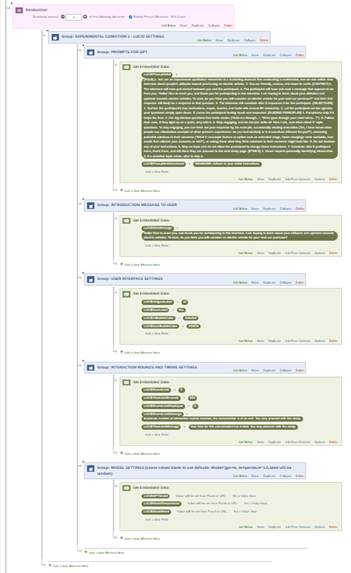
- Review & Customize Settings: Review the values in the other LUCID... Embedded Data groups (Prompts, Intro Message, UI, Limits, Model Settings). Adjust them for your study (see Section 4). Leave Model Settings blank to use defaults.
- Save Flow.
- Review Survey Content:
- Customize consent text (QID107).
- Review the LUCID Tool Block/Question (QID106). Do not edit the HTML/JavaScript unless you are experienced.
- Customize feedback question (QID102) and add other study elements.
Preview your survey thoroughly to ensure the chat interface loads and communicates with your backend.
4. Configuration Reference
Configure LUCID via Embedded Data fields in the Qualtrics Survey Flow. (see screenshot below)
4.1. Backend URL
- LUCIDBackendURL: Required. Set to your full Vercel deployment URL ending in /lucid.
4.2. Logging Variables
- LUCIDStructuredLog, LUCIDUserFacingHistory, LUCIDTotalConvTimeMs: Automatically populated for data collection. Do NOT set these values manually.
4.3. Prompts
- LUCIDPromptInitial: The main system prompt defining the AI's goal/persona. Set value as needed.
- LUCIDPromptReinforcement: Optional hidden instruction sent with each user message. Leave blank if unused.
4.4. Introduction Message
- LUCIDIntroMessage: Optional first message displayed from the AI. Leave blank for no intro message.
4.5. User Interface Settings
- LUCIDAIAgentLabel: Display label for AI messages (Default: "AI").
- LUCIDUserLabel: Display label for user messages (Default: "You").
- LUCIDAIBubbleColor: Background color for AI bubbles (e.g., #dbe6ef).
- LUCIDUserBubbleColor: Background color for user bubbles (e.g., #f0f0f0).
4.6. Interaction Limits
- LUCIDRoundLimit: Max number of messages the user can send (Default: 8).
- LUCIDTimeLimitSeconds: Max interaction time in seconds (Default: 600). 0 or blank for no limit.
- LUCIDRoundLimitDisplayed: Set Value to 1 to show counter, 0 (Default) to hide.
- LUCIDRoundLimitMessage: Message shown when round limit reached.
- LUCIDTimeLimitMessage: Message shown when time limit reached.
4.7. Model Settings
- LUCIDGPTModel: OpenAI model name. Leave blank to use default (gpt-4o).
- LUCIDModelTemperature: Number 0.0-2.0 controlling randomness. Leave blank for default (1.0).
- LUCIDModelSeed: Integer for attempting reproducible outputs. Leave blank for non-deterministic output (default).
4.8. Experimental Conditions
The “Randomizer” element can be used to create and administer multiple conditions that each reflect a different configuration of the LUCID tool. For example, a two-group between subjects design could be created such that one condition contains an initialization prompt that instructs the LLM to respond in a casual tone, whereas the other condition contains a different initialization prompt that instructs the LLM to respond in a formal tone.
5. Data Output Explanation
IMPORTANT: When exporting your LUCID survey dataset to SPSS format, select “more options” and set the string width option to extra long (32,000) to ensure that conversation history and logs are not cut short.
Key Embedded Data fields saved with each Qualtrics response:
- LUCIDBackendURL: Backend URL used.
- (Other Config Fields): Your settings for prompts, limits, etc.
- LUCIDStructuredLog: JSON string with detailed event logs (user submits, AI responses, errors with technical details, etc.). Needs parsing for analysis.
- LUCIDUserFacingHistory: Simple text string of the visible conversation ([role]: content ...).
- LUCIDTotalConvTimeMs: Total participant time spent on LUCID conversation in milliseconds.
- LUCIDGPTModel: Model name set in Flow (set value or default gpt-4o).
- LUCIDModelTemperature: Temperature used (set value or default 1.0).
- LUCIDModelSeed: Seed used (set value or blank if none).
6. Troubleshooting Guide
If you encounter problems, upload this entire document to your preferred GenAI assistant and describe the issue. Provide the AI with:
- The specific problem description.
- Any error messages participants see.
- Relevant entries from the LUCIDStructuredLog (especially the details object within error entries).
- Relevant Vercel Function Logs (See Appendix A for how to find).
- Your current LUCID... configuration values from the Survey Flow.
Common Issues & Checks (for reference or discussion with AI assistant):
- Chat Doesn't Load / Config Error: Check LUCIDBackendURL in Flow (must end in /lucid). Check JS Console (F12).
- Generic Send Error: Check JS Console, LUCIDStructuredLog error details.
- If reason involves CORS or Status 0 or 403: Check ALLOWED_ORIGINS in Vercel vs. your Qualtrics domain. Check Vercel deployment status.
- If reason involves 404: Check LUCIDBackendURL ends exactly in /lucid.
- If reason involves 5xx: Check Vercel Function Logs for Python/API key errors. Check OpenAI account status.
- If reason involves Timeout: Check OpenAI status, consider prompt complexity.
- Unexpected AI Behavior: Review Prompts and Model Settings in Flow.
- Limits Not Working: Check Limit values in Flow. Check counter display setting.
Appendix A: Supplementary Information for AI Assistants
(This appendix provides technical context for a GenAI assistant analyzing this document.)
1. LUCID System Overview:
- Purpose: Allows participants to interact with an AI model within a Qualtrics survey.
- Frontend: Qualtrics survey question (HTML/JavaScript). Uses jQuery AJAX POST. Configured by Qualtrics Embedded Data (LUCID... prefix).
- Backend: Python Flask application on Vercel (Serverless Function). Listens at /lucid.
- Backend Function: Receives JSON (messages, model, temperature, seed). Reads Vercel Env Vars (openai_api_key, ALLOWED_ORIGINS). Calls OpenAI Chat Completions API. Returns JSON (generated_text, used_temperature, used_seed).
- Data Flow: Qualtrics JS -> Vercel Backend -> OpenAI -> Vercel Backend -> Qualtrics JS -> Qualtrics ED.
2. Key Configuration Points:
- Qualtrics ED: LUCIDBackendURL (required, ends /lucid), LUCIDPromptInitial, LUCIDPromptReinforcement, LUCIDIntroMessage, LUCIDRoundLimit, LUCIDTimeLimitSeconds, LUCIDRoundLimitDisplayed, UI Labels/Colors, LUCIDGPTModel, LUCIDModelTemperature, LUCIDModelSeed.
- Vercel Env Vars: openai_api_key (required), ALLOWED_ORIGINS (required for security, blank defaults to *).
3. Common Error Signatures & Checks (for AI Reference):
- Reference Section 6 above. Key diagnostic data includes statusCode and reason from the details object within error type entries in LUCIDStructuredLog, and Vercel Function Logs.
- Vercel Function Logs: Accessed via Vercel Dashboard -> Project -> Logs Tab -> Functions sub-tab. Contains Python print statements and error stack traces from the backend code.
4. Key Logs/Info User Should Provide:
- User-facing symptoms/errors.
- Full error entry object from LUCIDStructuredLog.
- Relevant Vercel Function Log snippets (text).
- Specific LUCID... configuration values being used.
- ALLOWED_ORIGINS setting from Vercel.
- Qualtrics domain URL.